
Commercial Roof Inspection Checklist for Facility Managers
Most facility managers know their roof is a problem waiting to happen. The question is whether they catch it during a routine review or after a water intrusion event that has already reached the ceiling tiles, the insulation, and whatever was stored underneath. A commercial roof inspection checklist gives you a structured way to walk your roof before something forces your hand.
This guide covers every zone a thorough inspection should touch, what specific findings actually look like, and how to translate what you find into a repair, restore, or replace decision. That last part is where most guides stop short. It won’t here.
If you’d rather get a direct read on your roof’s condition from an experienced team, Silicoat Roofing’s restoration team offers a free roof analysis for commercial buildings.
Why Most Facility Managers Inspect Too Late
Commercial roofs fail gradually and then suddenly. The gradual part can last years. A seam that started separating two winters ago may have admitted only trace moisture until this spring’s runoff finally pushed water past the membrane and into the insulation board below. By the time the ceiling tile shows a stain, the substrate may have been compromised for eighteen months.
The result is predictable: what could have been a targeted repair or a restoration application becomes a full tear-off and replacement. The cost difference is significant. Silicoat’s restoration approach typically costs substantially less than full replacement, with the company citing savings of up to half the cost of traditional contractors. That option closes once the substrate is saturated or structurally compromised.
Deferred inspection also creates a documentation problem. When a building changes hands, gets refinanced, or goes through a capital planning cycle, the absence of inspection records means the roof’s condition is unknown. Unknown condition gets treated as worst-case condition for insurance and valuation purposes.
The practical standard for commercial roofs is two inspections per year, typically spring and fall, plus a walkover after any significant weather event. That cadence catches most failures before they escalate. What makes each inspection useful isn’t just showing up on the roof. It’s knowing what to look for and what a given finding means.
The Complete Commercial Roof Inspection Checklist
A thorough commercial roof inspection checklist covers six zones: the membrane surface, seams and laps, penetrations, flashings, drainage, and the interior. Use the structure below for every inspection. Bring a notepad or phone camera. Document everything you find with photos and coordinates on a roof diagram. Even findings that seem minor now become important in a year when you’re tracking whether something is progressing.
Membrane Surface Inspection
The membrane is your roof’s primary waterproofing layer. On a TPO roof inspection checklist, membrane issues are the most common finding and the most frequently misread.
Walk the entire surface in overlapping passes. You’re looking for:
- Blistering or bubbling: raised areas where air or moisture has entered between the membrane and the insulation layer below. Small blisters can be monitored; blisters larger than a dinner plate typically indicate a failed adhesive bond or trapped moisture that will grow.
- Surface cracking or crazing: a network of fine cracks in the top surface of the membrane, most common on aged EPDM and built-up roofs. Surface crazing without through-thickness cracking is often restorable, while through-thickness cracking is not.
- Punctures and tears: often from HVAC service visits, foot traffic, or storm debris. Mark their exact locations. A puncture without visible interior staining below may still be actively admitting water depending on how recently it occurred and your drainage pattern.
- Loss of granule cover on modified bitumen roofs: bare, exposed mat without granules loses UV protection rapidly. Granule loss that exposes more than 25% of the surface in any section is a material deterioration signal worth flagging.
One thing that surprises facility managers doing their first careful walkover: the membrane often looks intact from a distance but shows meaningful deterioration up close. Walking every section is the only way to assess it.
Seam and Lap Inspection
Seams are where most membrane failures begin, especially on flat roofs in climates with significant freeze-thaw cycling. In the Detroit region, seam inspection deserves particular attention in spring after a hard winter.
At every seam, press gently along the lap edge. You’re feeling for:
- Lifted or open lap edges: a seam that has separated even partially at the edge will admit water during rain before it shows any visual sign from a standing position.
- Fishmouths: an arch at a seam end where the membrane has pulled away from the substrate or the adjoining sheet. Common near corners and at T-intersections.
- Brittle or shrunk membrane at seams: EPDM in particular shrinks over time, placing tension on seam bonds. If the membrane feels taut and the seam edges are under tension, the bond may be close to failure even without visible separation.
Check every linear foot of seam. Mark any lifted areas with a flag or chalk, photograph them, and note the approximate length of the separation. A seam that has opened 12 inches behaves very differently from one that has opened 4 feet.
Penetration Inspection
Every pipe, conduit, HVAC curb, skylight, and rooftop unit creates a penetration: a point where the continuous membrane surface is interrupted. These are high-probability failure points because water finds edges, and the materials around penetrations (pipe boots, pitch pockets, cover flashings) degrade at different rates than the membrane itself.
For each penetration, check:
- Pipe boots and collars: look for cracking, hardening, or separation from the pipe. A boot that is pulling away from the pipe at the top is actively leaking during rain.
- Pitch pockets: these are fill-type seals around irregular penetrations. The fill material shrinks and cracks over time. Any pitch pocket showing a gap or void between the fill and the pipe should be flagged for immediate repair, since these are among the fastest water entry points on a commercial roof.
- HVAC curb flashings: check both the base of the curb (where the curb meets the roof) and the top edge (where the curb transitions to the unit). The base is the more common failure point; the top edge matters more on units with poor weatherstripping.
- Drain areas: drain collars and the membrane’s connection to each drain dome deserve their own review, covered in the drainage section below.
Penetrations are consistently one of the most common starting points for commercial roof failure, so this is not a zone to rush through.
Flashing Inspection
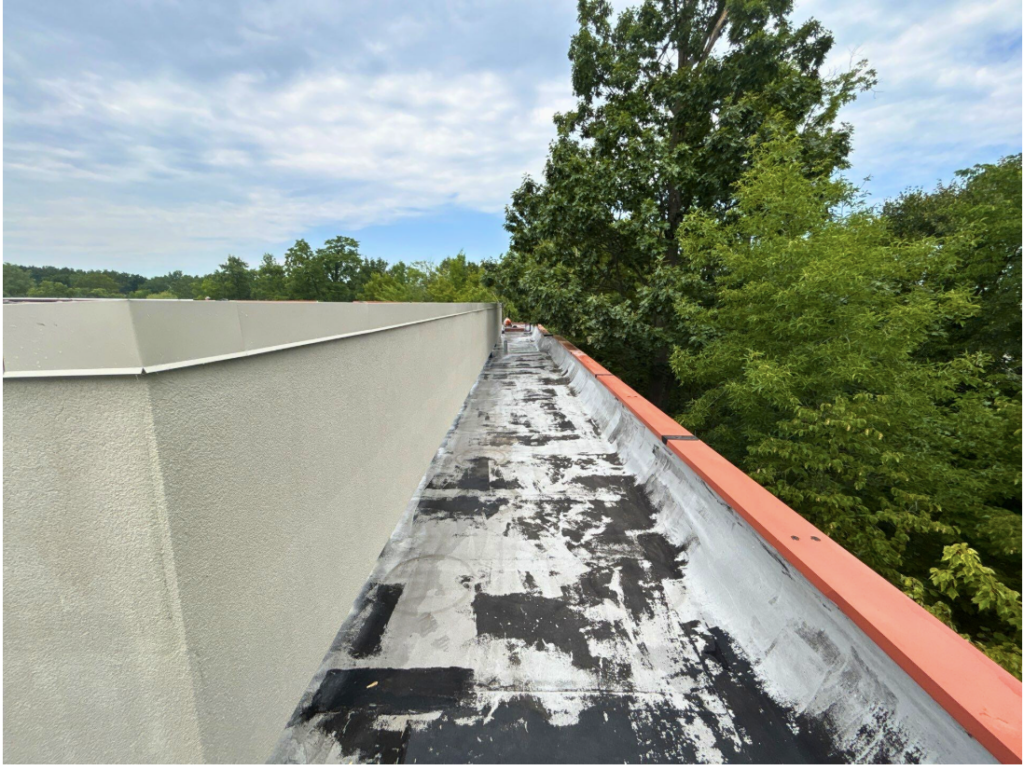
Flashings seal transitions: where the roof meets a wall, where it steps up to a higher section, where it terminates at a parapet. They are almost always the first element to fail on an aging roof, and they fail in ways that are often invisible from interior inspection.
Walk every perimeter foot and examine:
- Parapet wall flashings: check that the cap flashing is still sealed at the top and that the counter-flashing isn’t lifting. A cap flashing that has pulled away from the wall creates an entry point above the membrane level, bypassing the primary waterproofing entirely.
- Step and transition flashings: look for buckling, cracks at bends, and separation at seams. In cold climates, repeated freeze-thaw cycling causes metal flashings to fatigue at bends faster than the adjacent membrane.
- Termination bars: these metal strips hold membrane edges to walls and curbs. Any loose or missing fastener along a termination bar creates a potential entry point. Check by pressing along the bar for movement.
- Sealant condition at flashing edges: sealant at exposed edges typically has a shorter service life than the membrane itself. Cracked, shrunk, or missing sealant along flashing edges is extremely common on roofs that haven’t been maintained, and it is also one of the most straightforward repairs.
Drainage System Inspection
Ponding water is one of the most direct indicators of roof condition, but drainage inspection goes further than just looking for puddles.
Check every drain on the roof:
- Drain domes and strainers: are they present, intact, and clear of debris? A blocked drain during a heavy rain event creates ponding that can exceed the design load for many commercial roof structures.
- Drain collar condition: where the drain collar meets the membrane, look for separation, rust staining, or membrane pulling away from the collar edge. This connection is a frequent leak source, particularly on older built-up roofs where the original drain flashing has corroded.
- Ponding patterns: areas where standing water remains 48 hours after rain indicate low spots. Some ponding is normal in minor low spots and can be managed. Ponding that covers more than a few square feet in an area that should drain, or where the depth exceeds roughly 1/4 inch at 48 hours, indicates a structural deflection or blockage that warrants further assessment.
- Scupper and overflow drain condition: if your roof has scuppers (wall-level openings that allow water to drain off the edge), check that the scupper openings are clear, that the scupper liners are intact, and that the exterior discharge area below isn’t causing water to re-enter the building at grade.
Interior Signs of Roof Issues
The interior inspection often reveals what the rooftop inspection can’t. Walk the top floor ceiling with a flashlight in low-light conditions. You’re looking for:
- Active or dried water staining on ceiling tiles or drywall
- Efflorescence (white mineral deposits) on concrete or masonry walls near the roofline, which indicates long-term moisture movement
- Rust streaking from structural steel, indicating that moisture has reached the structural layer
- Soft spots or visible deflection in the decking above, if accessible
Interior staining and roof membrane location often don’t match directly. Water travels along decking and framing before it drops through, so a stain directly below the center of a room may originate from a seam failure at the perimeter. Use interior findings to triangulate. They tell you that a failure exists somewhere; the rooftop inspection tells you where.
What Your Findings Actually Mean
This is the section that most roofing checklists skip. A roof condition assessment checklist is only useful if it helps you make a decision. Here is a framework for translating common findings into a repair, restore, or replace outcome.
The Three-Outcome Decision Framework
Repair is appropriate when:
- The membrane is structurally sound across the substantial majority of the surface
- Failures are isolated: one or two seam separations, a single failed pipe boot, a patch of missing sealant
- There is no substrate saturation (tap the membrane in suspect areas: a hollow sound indicates trapped moisture, while a solid sound indicates intact insulation board below)
- The roof system is still relatively young
Restore is appropriate when:
- The membrane shows surface degradation, but the underlying insulation and decking are dry and intact
- Multiple areas need attention, but the failures are distributed rather than concentrated
- The roof has meaningful remaining structural life that can be extended through a liquid membrane application
- The client wants to avoid the cost and disruption of a full tear-off
Silicoat’s liquid silicone membrane restoration approach is designed specifically for this category: roofs that are too far gone for simple repair but where the substrate is still viable. The 20 Year Leak-Free Guarantee backs that outcome.
Replace is indicated when:
- Substrate saturation is confirmed across a significant portion of the roof area
- The decking shows structural deflection or corrosion
- Multiple membrane systems have already been applied (some jurisdictions and building codes limit layered systems)
- The roof is beyond its expected service life and repairs would be patchwork at best
The harder decision is the middle zone: a roof that might qualify for restoration but has several areas of suspect substrate. This is where professional assessment matters most, because a restoration applied over saturated insulation will fail prematurely regardless of membrane quality. If you’re weighing repair against replacement specifically, this breakdown of how to make that call walks through the financial side in more depth.
Reading the Signals Together
No single finding determines the outcome. What matters is the pattern across zones. A roof with lifted flashings, brittle seams, and interior staining at three separate locations is a different situation from a roof with one failed pipe boot and surface crazing in a single section, even if both checklists have the same number of items checked.
When findings cluster at seams and flashings but the membrane surface itself is sound and the interior shows no staining, the roof is likely a restoration candidate. When interior staining is widespread and the membrane shows multiple failure types across different zones, replace may be the only financially defensible path.
What Changes About Inspections in Detroit’s Climate
Detroit commercial roofing operates under conditions that accelerate specific failure patterns. Freeze-thaw cycling is the primary factor. The Detroit area typically experiences 40 to 60 freeze-thaw cycles per year [VERIFY with local NOAA data], and each cycle stresses roofing materials in ways that southern climates never encounter.
Here is what that means in practical inspection terms.
Seam separation is faster and more common. When water penetrates a partially-lifted seam edge and then freezes, the expansion of ice widens the opening. What was a 4-inch open seam in October can be a 14-inch open seam by March. Inspect seams in early spring, before the first warm rain, to catch what winter opened up.
Flashing lift concentrates at bends. Metal flashings expand and contract with temperature. Over multiple winters, the fatigue at bends accumulates. Termination bar fasteners also loosen as the substrate behind them cycles through freeze-thaw. Spring flashing inspections routinely find fasteners that were tight in October and loose by April.
Ice damming at drains creates concentrated load. When drains are partially blocked and temperatures drop, ice can form around the drain collar and across adjacent low spots. The weight of that ice is usually manageable, but the melt-refreeze cycle at the drain collar connection is a reliable source of seal failure over time. After any winter with multiple freeze-thaw events, the drain collar deserves close attention.
Blistering peaks in late spring. Trapped moisture that entered during winter begins to vaporize as roof temperatures climb in May and June. Blisters that weren’t present in a fall inspection can appear rapidly in spring. Schedule your spring inspection after the last freeze date but before temperatures consistently exceed 75°F, when blistering typically peaks.
The timing recommendation for Detroit commercial roofs: inspect in mid-April (after final freeze risk, before peak blister season) and again in late October (before first freeze, while sealants are still pliable enough for repair).
How Professional Inspectors Evaluate What Facility Managers Often Miss
A facility manager doing a careful self-inspection using a thorough flat roof inspection checklist will catch most visible surface issues. What a professional inspection adds is beneath the surface and at the transitions.
Professional inspectors use infrared thermography to detect moisture in the insulation layer without cutting the membrane. Wet insulation retains heat differently than dry insulation, and an infrared scan after sunset can map saturated areas across a large roof in under an hour. A visual inspection, however careful, cannot detect subsurface moisture without core sampling.
Experienced inspectors also read failure patterns across the whole roof rather than logging individual findings. A single lifted seam near an HVAC unit might be a one-time mechanical damage event. Four lifted seams within 20 feet of each other, all running in the same direction, indicate a thermal expansion problem or a substrate movement issue that will keep creating new failures regardless of how carefully each one is repaired.
The documentation a professional inspection produces also has a different value. An inspection report with photos, measurements, and moisture mapping creates a record that supports insurance claims, capital planning justifications, and warranty applications. A phone camera tour by the facilities manager, however thorough, typically doesn’t.
With over 20 years of expertise, Silicoat Roofing’s team has evaluated hundreds of commercial roofs across the Detroit metro area. The roofing inspection points they prioritize reflect patterns observed across real buildings in this climate, not a generic national checklist.
Turning Your Walkover Into an Action Plan
Completing a roof walk gives you a snapshot. What you do with it determines whether it was worth the time.
Organize your findings by zone and severity. A simple three-column format works: finding, location, severity (monitor, repair soon, or repair immediately). Severity is determined by whether the finding is currently admitting water (immediate), likely to admit water before the next inspection (repair soon), or showing deterioration without active failure (monitor).
Photograph every finding with a reference marker. A photo of a seam separation without a location reference is hard to act on when a contractor arrives two weeks later. Stand back far enough that a fixed reference point (an HVAC unit, a parapet corner, a drain) is in frame.
Compare to your last inspection record. If a finding existed at the last inspection, has it grown? A 6-inch seam separation that grew to 14 inches over one winter is a different urgency than one that has been stable for two years. Trend matters as much as current condition.
Get professional assessment for anything in the moderate or severe category. A roof membrane inspection for moisture content, using either core sampling or infrared scanning, gives you the substrate information your visual walkover can’t provide. That information is what closes the gap between “I think this roof needs work” and “I can justify a capital budget request to the building owner.” Silicoat Roofing’s team can help with repair and maintenance services once you know what you’re dealing with.
Facility managers who document consistently find that they spend less money on emergency repairs over time, not because the roof stops failing, but because they catch the patterns before failure becomes crisis. That discipline is the practical argument for taking inspection seriously.
Frequently Asked Questions
How often should a commercial roof be inspected?
Commercial roofs should be inspected twice per year, typically in spring and fall, plus after any significant weather event such as a hailstorm, high winds, or ice accumulation. In climates with significant freeze-thaw cycling, like the Detroit metro area, the spring inspection is especially important for catching what winter opened up.
What is the difference between a roof inspection and a roof assessment?
A roof inspection is a visual walkover that documents observable conditions across all roof zones. A roof assessment typically includes both a visual inspection and diagnostic testing, such as infrared moisture scanning or core sampling, to evaluate substrate condition. Inspections identify visible problems; assessments tell you what’s happening beneath the surface.
Can a facility manager do their own roof inspection?
A facility manager can and should do preliminary inspections using a structured checklist. These walkovers are valuable for tracking conditions between professional visits and for identifying issues that need immediate attention. Professional assessment adds diagnostic tools and documented findings suitable for insurance, capital planning, and warranty applications that a self-inspection typically cannot provide.
How do I know if my commercial roof needs to be replaced rather than repaired?
Replacement is indicated when substrate saturation covers more than roughly 25% of the roof area, when the decking shows structural compromise, or when multiple membrane systems have already been layered. Roofs with sound substrates and deteriorated membranes are often strong candidates for restoration at significantly lower cost than replacement. The substrate condition, not the surface appearance, is the deciding factor.
What causes flat roof seams to fail?
Seam failure on flat roofs typically results from thermal cycling, UV degradation of the membrane material over time, improper original installation, or mechanical stress from HVAC equipment vibration. In northern climates, water entering a partially-lifted seam edge and then freezing accelerates the opening significantly. Most seam failures start at lap edges or T-intersections where multiple membrane sheets meet.
How long does a commercial roof inspection take?
A thorough self-inspection using a complete commercial roof inspection checklist typically takes 1 to 3 hours for a roof under 20,000 square feet, depending on the number of penetrations and the complexity of the drainage system. Professional inspections that include infrared scanning can take longer but cover significantly more ground in terms of subsurface moisture detection.
What should I do if I find ponding water on my commercial roof?
First, check that all drains are clear of debris. If drains are clear and water is still standing 48 hours after rain, the issue is likely a structural low spot or insufficient drainage capacity. Note the location and approximate area of ponding, photograph it, and have the drain collars and surrounding membrane inspected. Persistent ponding is not automatically an emergency, but it is a condition that should be assessed before the next winter.
Ready to Get a Professional Read on Your Roof?
A completed roof walkover gives you something most facility managers don’t have: a documented, zone-by-zone picture of your roof’s actual condition. That picture changes what a contractor conversation looks like. Instead of “the roof might be a problem,” you arrive with specific findings at specific locations, which means you get specific answers instead of a sales pitch.
Silicoat Roofing’s team has spent over 20 years evaluating exactly this question on Detroit-area commercial buildings. If your inspection turned up findings you want a professional read on, a free roof analysis puts a specific answer in your hands without obligation.
About the Author
Rick Dodaj is the founder and CEO of Silicoat Roofing, specializing in commercial roofing solutions that protect businesses and their investments. With extensive experience in commercial roofing, Rick leads a team dedicated to providing cost-effective, long-lasting roofing solutions.
 Next Post